Category: Budget

Wrapping up February’s Focus on Finances

focus on finances month, finances, money help

February’s Focus on Finances is done!

How did you do last month? Did you hit your goal of increasing your emergency fund or making a dent in your debt? I set a pretty lofty goal for our money and I knew it would be hard to hit it. But I made a serious dent in reaching it. It won’t be long before we have $3,000 in our emergency fund.
Why did I want $3,000?

Well each of our health insurance deductibles is $1,000. Since there is three of us in the family I wanted $3,000 in the bank. You never know what will happen and having that amount would be a weight off of our shoulders.

What did you focus on to increase your money?

We planned our meals for the entire month. It was hard to not give into temptation, but if we didn’t have eating out in the plan that week then we stuck with it. I was able to create some new recipes that we really loved.

We also sold quite a few things on our area’s Facebook Swap Shops. That money went straight into the savings account at the bank. Whatever I didn’t sell I ended up donating at the end of the month to our local Rescue Mission.

Now that you have spent the past 28 days really focusing on your money and what areas you need to improve, it’s time to stick with it. I understand it may be hard to stay so strict, but don’t relax all of the way. Keep working with the cash envelope method. It can help you stop overspending. We use an easier cash method that I’ve talked about before.

Leave me a comment letting me know one thing that really helped you through February’s Focus on Finances.  I’d love to know!
Check in on our Focus on Finances Month

focus on finances month, finances, money help

Alright, we’re about half-way through February and I thought it was time to check in. At the beginning of the month I declared it to be February’s Focus on Finances.

I still love that alliteration!

How are we doing? It’s hard isn’t it? I’m not going to lie I set a pretty hefty goal of bumping our emergency fund to $3,000. Luckily we had paid off some debt before 2016 ended, but we still have money needs that keep coming up. Last year I wanted to save $300 by the end of the month. And it was hard, but I achieved it. This year I increased that goal quite a bit by wanting to save $2000 in 28 days (we already had our emergency fund at $1,000 so I only needed $2,000 more to hit our goal). I shared some really great ideas on how to cut spending to hit that $300 mark.
This year I added one to that list… selling our old stuff.

I went through our closets and garage to find items we no longer needed. Now I’m selling them. There are a variety of places you can sell stuff – Ebay, Craigslist, and Facebook Swap Shops. My top choice is Facebook. It’s easier for me and for some reason I feel safer doing it. I can check out someone’s profile before meeting them. I also meet at my work during the day. I don’t meet in the evenings and I never let anyone come to our house.

I’ve shared my love of Facebook Swap Shops before when I scored some great buys for our little guy. I plan on utilizing this more when I need more clothes for him. I don’t think it’s necessary to buy brand-new clothes for a growing boy that isn’t going to stay in them for very long.

Anyway, back to my focus on finances. I plan on selling what I can for a good price. That way I can increase our savings while getting rid of junk that’s taking up space. If something won’t sell then I plan on donating it. That way the junk does not reappear in the garage.

I also plan on shopping at flea markets and thrift shops if anything comes up that we need.  I put together a handy cheat sheet to make sure you get a good deal when out shopping.  You can even put some of these tactics to use if purchasing something through a FB Swap Shop.

2017 February’s Focus on Finances

focus on finances month, finances, money help

Last year my Focus on Finances was a huge hit in February so I decided to bring it back.

I love alliteration – February’s Focus on Finances. It’s hard not to bring something back that just sounds good. So here we are. New year, same focus on a much needed area.  During last year’s focus my sights were a lot less than last year, but since I achieved my goal I figured I needed to make it harder.

Last year I was pregnant and had no idea our little guy would only be staying in 11 more weeks. I was so happy that I took time to really focus on our money to help prepare for the baby. I actually share how we were financially preparing for baby awhile back. But all of the focus really helped us with his early arrival.

I know, I know this picture doesn’t really have anything to do with focusing on your finances.  But you just have to love a boy on his brand new trike.  Look at that face!  I want to give our kid so much more than I ever had.. and I had it pretty darn good!  So by buckling down and working on our money situation now then J and I will be able to do so much for our son.  So maybe this picture does have something to do about getting your money right… maybe it was my secret plan to tie a seemingly unrelated photo back to the topic… or maybe I just wanted to include a picture of our son and somehow managed to connect it all.  Who knows…

This year there is no baby coming, but we do have a quite a bit of fun we’re planning for. My biggest is our little guy’s first birthday in April, a trip across the state to visit one of my best friends, a work-trip to Vegas (bummer I know!) and so much more.

One of my main goals for this year was to not stress over money. I know it’s easier said than done… but I am making a sincere effort. The main goal of February’s Focus on Finances is to pick a few money areas that need work.

This year it’s about our emergency fund. I want to build it up a bit more. It’s nice to start with $1,000 as a minimum, but once you hit that and have some debt paid off it’s time to build it more. So now my goal is to have enough for each of our medical insurance deductibles, which would be $3,000.

I started the 52 week savings challenge in January and it has been a big help on keeping me from impulse shopping. A dollar here and a few dollars there can really add up. This month I’m going to be adding an additional savings challenge so we can build our emergency fund. I don’t know if I’ll hit my goal of $3,000 but I’m sure going to try!

What part of focus on finances are you going to work on? There are some many money areas to pick from. And honestly you can pick more than one. Just don’t spread yourself too thin and get overwhelmed. Remember you control your money, it doesn’t control you!

You can set a debt pay off goal
You can reach towards that $1,000 in your emergency fund
Start saving for next year’s real and personal property taxes
Begin retirement planning

Whatever you choose, stick with it. February is a short month and it will be over before you know it!

Want more money tips? Check them out!

52 Week Savings Challenge

52 week savings challenge, savings challenge, build your savings fast, quickly build your savings, how to build your savings, meredith rines, merelynne

Can you believe 2016 is over? I mean, seriously that year flew by! So many changes happened in our household that it’s hard to keep track of them all. Of course, I remember the big one – you know, having a baby. That was probably the most important part of 2016 for our family.

However, we had a lot going on. We had to remodel the house a bit to make room for the baby. I kept working towards my CFP designation and am one step closer to being a Certified Financial Planner (yay!) and I survived another #taxseason without killing anyone.

We traveled a lot and just had an amazing year. I can’t wait to see what 2017 has in store for us. With all of the surprises and planned expenses last year, we decided to kick off the new year with a bang! We’re setting an additional savings goal on top of our budgeted one.

What?!

Yep, that’s right!

We plan on starting a 52 Week Savings Challenge on top of what we’re already putting aside each month.

We looked at our budget and decided with all of the highs and lows of last year, it wouldn’t hurt to have an extra $1,300 in savings for those unexpected needs. So instead of increasing our savings goal, we chose to go a fun-route.

Yes, savings can be fun!

We created an easy-to-follow 52 Week Savings Challenge. It’s easy to follow and you can really tackle it any way you want.

Here’s the gist of the savings challenge:

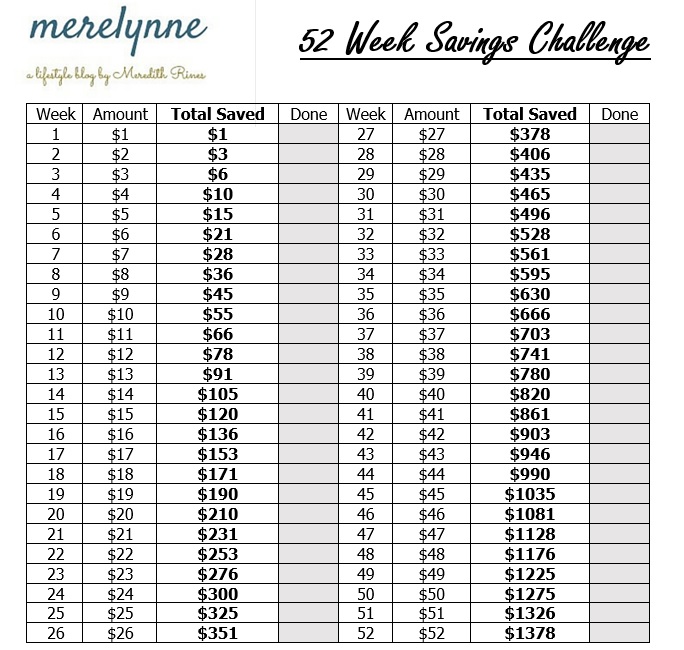
Start off with saving $1 the first week, then add $1 every week to you new goal. Here’s what it looks like for the whole year:

week 1 – $1, total of $1
week 2 – $2, total of $3
week 3 – $3, total of $6


week 52 – $52, total of $1,378

52 week savings challenge image

I created an easy PDF for you to download to keep track. You can download this free printable here.

Here’s another way to tackle this new 52 week savings challenge:

You can start with week 52 and work your way backwards. That way you’re starting with savings $52, $51, $50 and so on now then when it’s closer to the holidays your savings would be less than $10 a week. It’s up to you.

Just decide which way is best for your family to follow and then get started. The biggest thing is to start now and keep going with it.

Don’t give up!

You can have an extra $1,378 saved by the end of this year. That’s quite a bit for only a few dollars each month. We plan on finding the extra money by cutting out our eating out. We’ve been watching what we’ve been spending for awhile now. By following our easier cash envelope system, we will be able to easily find the extra dollars each week to add up.

What are you going to do with this extra savings at the end of the year? It’s going to be good to use towards Christmas gifts or you can add it to your emergency fund or even debt! Whatever you want to do with it, it’s up to you!

Just think, $1,378 can be yours by saving a few dollars each month for the next 12 months. So easy!

Stocking Stuffers That Won’t Break the Bank

Stocking Stuffers that won't break the bank

It’s that time of year again. It seems to come so fast and without warning. I mean, you think Thanksgiving would be a fair warning, but it never is. Last year I did so good shopping for Christmas presents for our family and friends on a budget. I decided this year to do it again. I’m going to stick to last year’s plan, which you can read about here. I was really able to come in golden on our holiday spending. All it took was a little planning and a little Black Friday shopping.

This year with it being the baby’s first Christmas and all, we’re going to break out the stockings. Nothing too crazy because the baby isn’t even a year old yet. I’m not that mom… yet!

Every other year we switch holidays with my family and J’s family. This year is time for Christmas with my family. My Mom always goes above and beyond on stocking stuffers every year. Most of the time the items are too big to fit in the actual stocking, so we each just get a spot on the couch and out stocking is laid on top of everything.

When it’s our turn to be with my family I usually like to help my Dad out by getting stocking stuffers for my Mom. Let’s be honest, he’s not the best at what to get her and never knows if he has enough or too little. So my sister and I usually tag team it and take care of it for him.

This year, I wanted to get some awesome stocking stuffers that won’t the bank. So I’m doing what I do best… coming up with a plan!

The best plan is to be thinking ahead all year long. Whenever you’re out and spot something for a good deal (like a really, really good deal) then go ahead and buy it. But for me that’s hard. If I buy too early then I have to find a place to store the items and actually remember where they are before Christmas. That doesn’t happen too well in my house.

So I like to hit up a few key stores to get some good deals on stocking stuffers.

Dollar Stores

You can get some really great pieces for only $1. You can be creative and think outside the box at these type of stores.

For little ones look for toys and games – chalk, bubbles, little figurines. Let’s face it kids are rough on toys and there are probably some really great items under the tree so stocking stuffers don’t have to be anything too expensive.

For adults you can find some items that are sure to catch your eye. For women I usually go to the nail care aisle. I can grab some nail files and little mani/pedi kit. They also have some cute coffee mugs that make great stuffers. For the men in your life most dollar stores sell car cleaning pieces. They aren’t the highest quality, but the rags and sponges work just fine.

Big Lots

In our small(ish) town Big Lots is the place. You can find just about anything at Big Lots. I like to grab favorite candy and throw that in the stockings. Sometimes you can get lucky and find name brand items that are really discounted. So again, be creative and you can find some great stuffers.

Target $1 Bins

This is another favorite. Those bins are magical! You never know what they are going to have and some of those pieces are really neat. You can find great stuffers for any age.

I’m a huge fan of notepads. I know my Mom likes them to make lists on them and most people can always find a need for a notepad and pen set. You can sometimes find some great kitchen utensils too that are colorful. Those make great stocking stuffers!

Amazon Add-Ons

I use Amazon a lot for our dogs. Yes, I buy stocking stuffers for our dogs because I’m that lady. I’m okay with it too! I like to shop on Amazon for some of our household items. Amazon has really inexpensive add-on items. I like to go through their dog toy sections to find some good quality, inexpensive toys.

I also use the Amazon add-on feature for smaller gifts for friends, co-workers and even my family’s pets.

Christmas Clearance

If you are someone that can buy in advance and then not lose your stocking stuffers, I would recommend stocking up during Christmas Clearance. You can find some great deals at some really great prices. You just have to remember where you store everything before next Christmas!

You can find some great quality pieces at Wal-Mart, Target and even department stores like DIllard’s and Macy’s. You just have to keep your eyes peeled.

Words of Advice: Just because something is inexpensive doesn’t mean it would make a great stocking stuffer. Really think about whether or not you want to gift the item. I like to think about each person I’m buying for – what they like, their hobbies, etc and then try to find stocking stuffers that fit them. I’m also a stickler for quality. Just because something is only $1 doesn’t mean it’s worth $1.

Handmade Items

If you’re feeling crafty then you could always make stocking stuffers.  I did a small gift exchange with my cousins a few years back where each gift had to be under $3.  So I crafted a DIY ornament.  They turned out great.

So what are your go-to stocking stuffers that won’t break the bank?

How To Quickly Boost Your Savings

quickly boost your savings

If you’re like me then you just love seeing your savings account and retirement accounts grow.  It is such a great feeling to watch it increase month after month.  I love the peace of mind a happy savings account gives me.  After our little one was born he was put into the NICU for a few days since he was losing too much weight.  Then afterwards we had to do physical therapy every week for 3 months.  I wasn’t that nervous to see our insurance bills come in.  We have insurance, but we knew we still had to pay any deductibles and co-pays.  Now, it was still a lot of money to payout.  But it could have been a lot worse if we didn’t have our savings built up.  

I’m not going to lie, it took some time to get the account back to where it needed to be, but I’m happy to say we’re there.  J and I buckled down to boost our savings.  There’s a few reasons you want to build your savings:

Prepare for the unexpected.

Peace of mind.

Tool to help cut your spending.

I’m sharing a few ways to quickly boost your savings account balance.

When you think about starting a savings account or working on getting to a certain threshold (I recommend starting with $1,000) then it can get overwhelming.  I find that when people get overwhelmed they tend to shut down. If you shut down then you will probably procrastinate and never actually start saving. I like to break bigger goals down into smaller, more manageable ones.

I’ve come up with some quick ways to start building your savings account.

They don’t take but a few minutes to set up and can really make a different in your money goals.

Establish an automatic transfer.

Okay, this seems like an easy answer, but so many people don’t utilize it.  Most banks (like almost all of them) allow you to setup an automatic, recurring transfer between accounts.  So, go in and set one up.  Create it to happen on your actual payday so as soon as money goes in, it goes right back out.  I recommend the minimum amount to be 10% of your take home pay; however, you should really push yourself to do more until you reach that $1,000 balance.  

See if your employer can split your paycheck.

If you would prefer to never have the money hit your account, then see what your employer can do.  A lot of employers are opting for automatic deposits on payday.  Which makes it so much easier for you!  The last few employers I had allowed me to split my paycheck between two accounts.  I could specify either a dollar amount or percentage split between the two accounts.  This way that money will never, ever hit your checking account.  

Put back 10% of each paycheck.

A great way to save more money is budget for at least 10% of each paycheck goes into your savings account.  Even if you don’t have a way to do automatic transfer, you should still be putting back 10%.  Now if you want an extra boost to your savings account, then increase that amount.

Treat it like an expense.

Putting money away for a rainy day should be treated like an expense on your budget.  I’ve talked about this before, but you should pay yourself first.   That means to put money back in your savings.  Treat savings as an expense that must be taken care of ASAP each and every month.

Break it up into weekly payments.

To make it seem less like a burden, you should break your monthly savings amount into weekly chunks.  It helps take the pressure of a large transfer and makes the amounts much more manageable. 

If you have any other quick ways to boost your savings, please feel free to share them below. I’m always looking for handy money tips.

Newborn Must Haves We Love

*Affiliate Disclosure: Please note that when you click links and purchase items, in most (not all) cases I will receive a referral commission. You will not pay more when buying a product through my link.

newborn must haves on a budget

 Our little Baby is going to be 6 months old tomorrow (what?!?!).  I know he is no longer considered a newborn (cue the tears!), but having a baby doesn’t necessarily mean you’re always going to be on time with things now.  Hence this post being so late!  

He’s our first, so we had a lot of learning to do those first three months.  It’s no lie we developed a serious crush on some of his stuff and wanted to share our newborn must haves. I wanted to share what we loved and what didn’t work out too great for us.

I tried to keep these newborn must haves within our budget so these are budget friendly items. The ones that seem a bit high are well worth the investment. I would recommend registering for most of these (if not all) for your baby shower.

For Sleep

Fisher Price Rock N Play – He loves to sleep in this during the day while I’m working around the house. He isn’t crazy about the rocking being turned on yet, but he does like the vibrations. I think the elevation is really nice and what he likes so much about it. Plus it’s light, so we can travel with it easily. I like to take it with me when I shower so I can peer out to make sure he’s okay.

dockatot

DockATot – this purchase has been a lifesaver for us!  He loves it, which means he’s sleeping great at night.  We love it because he’s sleeping great, but also because we feel safe with him being in the bed with us.  Plus, when we travel we just take the DockATot with us.  He’s familiar with the DockATot so he goes right to sleep no matter where we are.

Tummy Time

Boppy Pillow – we use this for tummy time, feedings, and sitting up. It works great for tummy time since he’s cushioned all around. I love that case comes off and is machine washable. I like to wash it a few times a week just to keep it nice and clean since he puts his face on it.

Fisher Price Play Gym – we received this play mat during one of my showers. It’s great. With three dogs running around we aren’t crazy about Baby being on the bare floor, so we put this down. It’s cushioned and has a play gym over it for when we lay him on his back.

Mommy Saver Lite App – it flashes shapes and designs that are mostly black and white, but they do throw in some colors.  It also plays a pretty soothing tune while turned on.  He is in awe of it during tummy time and it’s a great motivator for him.

Feeding and Soothing

Dr. Brown’s Bottles– I could go on and on about these bottles! I planned on breastfeeding so I didn’t do much research on bottles. But when that planned failed, we had to resort to using bottles with formula. After the first few days I just knew his little tummy was really hurting. We received some bottles during our showers, but I wasn’t sure if any were made to help relieve gas. I found these Dr. Brown bottles from other mommy bloggers and decided to give them a try. Luckily we received one from J’s aunt. It helped tremendously! Then I ordered more from Walmart and picked up in the store.

JollyPop Pacifiers – We were introduced to these while in the NICU. It really helped keep him calm during all of the poking and prodding. I talked to the NICU nurse and she recommended these due to their shape. She said it really helped soothe them, but wouldn’t cause any problems with how his little mouth formed around the pacifier. She gave us a few to take home and he really loved them compared to our other ones.  Now I’m not going to lie after about the second month, he stopped taking a pacifier on a regular basis.  We tried several other brands, shapes, and so on, but he didn’t like any of them.  I still carry one that we got from the NICU in my diaper bag just in case.  

Travel

Carseat Cover – This carseat cover is perfect for when we’re out and about. Not only does it protect him from the elements – rain, wind, sun and such, but it protects him from germ-filled people. Before I purchased this cover, people always were stopping to look at him. No one tried to touch him, but I knew it was inevitable. After the NICU I didn’t want any sick people getting too close to our precious boy. Now they can’t see him so out-of-sight, out-of-mind.

CuddleBug Wrap Carrier – I came across this wrap online and ordered one. It wasn’t as expensive as some other wraps I saw, which was a nice bonus. I like to wear this even around the house. If he’s a bit fussy then I all wrap him up and carry him while I work around the house. I can do laundry, dishes, cook dinner and clean all while he sleeps. It’s a bit heavier fabric then some other wraps on the market, so I’m not sure how it would go as the only means to carry him on a hot summer day.

newborn must haves

Infantino Fusion Carrier – This carrier is great! It’s a bit lighter so during the hot summer days when we’re outside, I like to use this one.  I took our little guy with me to work for the first 5 months (hello! waiting lists!) so I was able to wear him while I worked.  It was such a blessing!  Now that he’s getting older and bigger, it will transition to other positions.  Since he has good neck control these days, he loves to be facing outward to see everything.

The So-So Newborn Must Haves

Little Me Swaddles – when we first came home from the hospital and NICU this guy saved us. He loved it how snuggled it made him feel.  As he grew the more he hated having his legs bound.  So we stopped using it after he turned 2 weeks old.  He sleeps great without it, but I still take one with me when we travel just to be on the safe side.

newborn must haves, newborn products

Delta Children Sweet Beginnings Bassinet – We let him sleep in a bassinet when we first got home, but realized he never got very much sleep in there.  So that’s when we upgraded to the DockATot.  We purchased this one from Wal-Mart and I used it in the family room or when I took a shower.  It’s on wheels and I can just roll him around the house, which is nice to have!  

Want a Better Budget? Here’s How!

flexible budget, better budget

Today I want to show you that you can have the perfect budget in less than 10 minutes.  I shared a while back in this post my best secrets for creating a flexible budget.  I’ve had a lot of people ask just how I did it.  So I created a quick video that shares my best stuff!  Check it out here.

If you like to go through it step-by-step then keep reading.  Let’s start with the most important part of creating a better budget…

Budgets are here to help.

So many people I have talked with are afraid of budgets.  That’s silly. Budgets can help you succeed, hit your goals and retire comfortably.

Budgets don’t have to be complicated either.  In less than 10 minutes you should have a working budget to go off of.  

Here’s my no fail guide on how to create a flexible budget in under 10 minutes.

Step One:

Gather your bills.  I’m assuming you know where your bill information is kept.  So, if you can’t find them in less than 10 minutes then that’s not on me.

Grab a pen and paper or use Excel.  I prefer Google Sheets because you can update it and check it from anywhere.  I even use Google Sheets as our check register and it works fantastic!

how to create a budget in 10 minutes, better budget

Step Two:

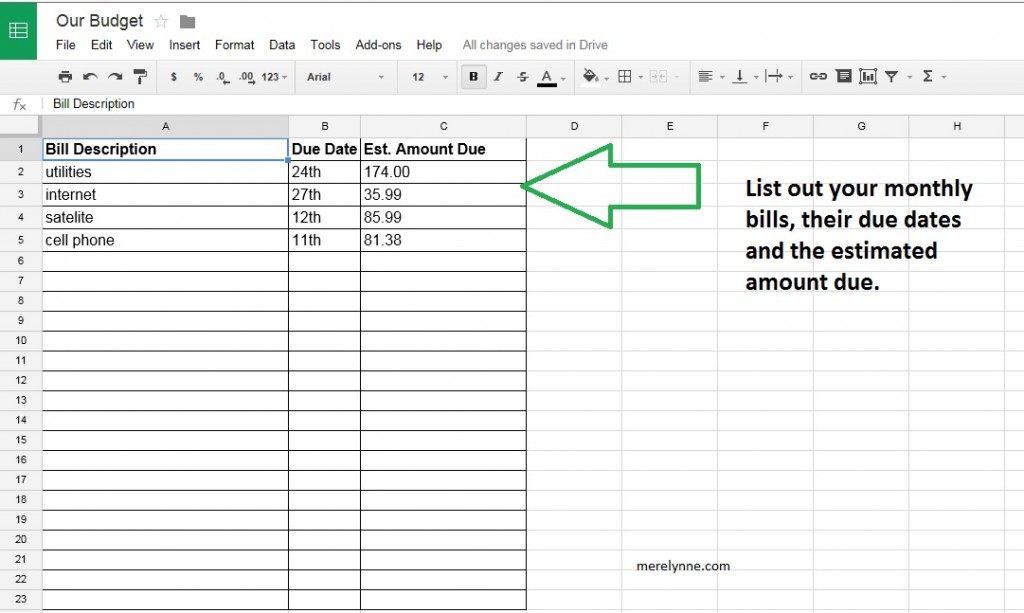
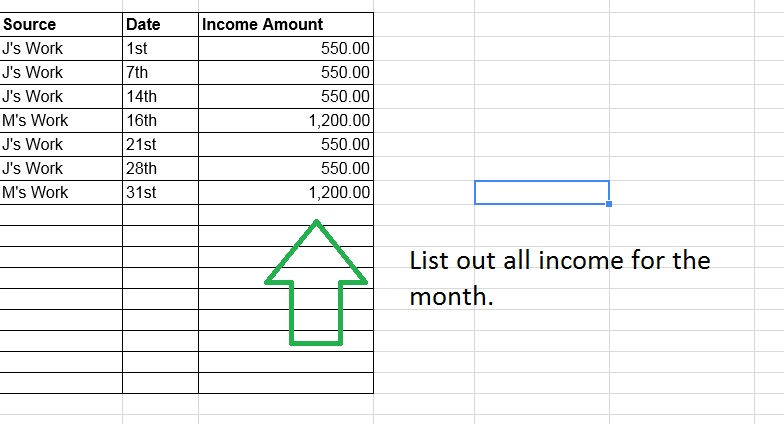
Create two column for monthly bills and expenses, the first one will be the name of your expense and second column is for the amount.  You can even add another column marked for due date so you never miss a deadline.  Start filling in.

This section is for your monthly bills and your debt.  So to be sure to list out your credit cards, personal loans, car loans, etc.

TIP: It’s best to calculate the monthly amount for any quarterly or annual bills you may have.  You need to be setting it aside each month.  For instance, you real property tax is $822 due by December 31st.  If you are creating your budget in January then you need to take $822 divided by 12 months.  You would get $68.50.  You should be putting back $68.50 a month.  

Now let’s say your tax is still $822 but you’re creating your budget in February.  You will take $822 divided by 11 months to get $74.73.  You should be putting that amount into a savings account each month.

This tip will help those type of bills from creeping up on you.

how to create a budget in 10 minutes

Step Three:

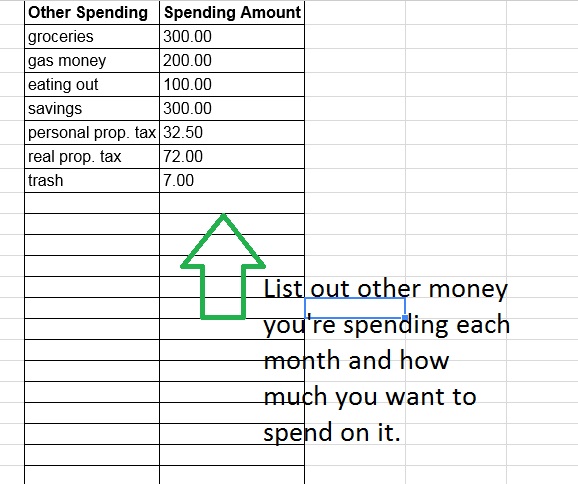
Other monthly spending should be accounted for – groceries, gas money, eating out, savings, retirement, etc. The easiest way to see how much you’re spending is by logging into your bank account.  You can pull a month’s worth of charges and add them up for each category.

TIP:  You need to lower these amounts if you find yourself in the red at the end of every month.  If you’re spending $400 a month for groceries for two people then look at reducing it.  You’ll have to shop smarter.  I recommend keeping your grocery budget to $100 per person in the family.  So for a family of two that would be $200.    

how to create a budget in 10 minutes

Step Four:

Write down your income.  You need to know about how much you have coming in every month.  Don’t count on bonuses, just put your monthly salary down.  We don’t want to depend on money that isn’t guaranteed.  That’s why we leave off bonuses and commissions.  Just put your base pay in here.

Step Five:

You’re done.  Now you need to add up your expenses and income.  Make sure you aren’t spending more than you make.  If you have extra income left over then look at putting it to good use.  Pay down your debt and start to build up your retirement funding.  

Making Your Own Baby Food – Pears

easy baby food recipes

Today I wanted to keep going with our baby food making adventure.  I thought I would add pears to the mix.  This is the easiest recipe ever!  Technically you don’t even have to cook them since they are such a soft fruit.  However, by cooking the pears you can help break down the sugars.  It makes it a lot easier for your little one’s digestive system to break them down.  I’m all about making it easier on their little bodies, especially since this whole solid food thing is so new to him.

I created a video that walks through making your own baby food.

Or you can follow along below.  It’s super, super easy to make this puree.  I love it!

make your own baby food

Pureed Pears

3 pears, or more (any kind will work) – $1.77 pound
Pot of boiling water

Wash and peel your pears. Deseed and chop them.  Add to the pot of boiling water and let cook for about 5-8 minutes.  Strain.  Blend in a food processor or blender.  I use my Magic Bullet that I purchased about 3 years ago.  The younger your little one is the smoother your puree should be.

The best part about this whole recipe is that it takes less than 10 minutes!

It’s also not an expensive recipe to make, too.  In my last post, I talked about how much jarred baby foods cost.  I averaged it out and it came to be about $0.60 an ounce!  I knew I could beat that by making them on my own.  So far I’ve come out on top every single time.  This one is no different.


I love saving money!! Boom!

Once it was all said and done, I put my extra puree in my Fresh N Freeze Reusable Containers and the OXO Baby Food Tray.  For less than $15 I’m not able to make extra food, free them and then pop them into the fridge a few days before he’s ready to eat.

Want to Save 20% at the Grocery Store? Here’s How

money saving tip for grocery store, Want to save 20% on your grocery bill-

I want to share with you, my favorite people, my #1 money saving tip when at the grocery store. It occurred to me that I hadn’t shared this specific tip before when I created my other grocery money saving tips. I thought it was so simple, but after talking with some friends and sharing this photo on instagram, I realized it needed to be said.

I started shopping this way back in college to save time. What I found out was that I was saving so much more than just time. I had started saving money. Now when you’re in college, money is harder to come by. I was in school full-time, working full-time and 2 part-time jobs, but still I just never had enough money. Now here I am, 30 years old with my own family and it’s not that I don’t have money to spend, it’s that I want to save money so I can save more for our future.

Here we go… my number 1 money saving tip for grocery store…

Make your list in order of the store’s aisles.

Seems so simple, right? But most people don’t do it. They create their list as things pop into their head.

You’re making dinner and realize you’re almost out of cooking spray so you jot that down. The next morning you throw away your empty body wash bottle so you quickly add that to the list.

Next thing you know your shopping list is a hot mess. You will either have to do A LOT of backtracking to get everything or you’ll have to skip around on your list as you shop. Which means the likelihood of you skipping something has just increased. It also means you’ve just stepped up the possibility of adding items to your cart you don’t actually need.

J and I keep a running list in the kitchen. We jot everything down that we need as we think of it. Then on Friday or Saturday we create our meal plan. I try to only go shopping for the majority of our stuff every 2 weeks. That way we can buy in bulk, split packages of meat better, and save money.

Now if I have to go to the store in between it’s usually for produce.

Once we have our meal plan done, then I sit down with my list from the kitchen and the meal plan to create the master shopping list.

money saving tip for grocery store

My master list goes in order of the store. The first thing you see when you walk into my Wal-Mart is the produce department, so I start there. I go aisle by aisle of what I need. It took some time to learn where everything is, but for the most part we stick to the same basic meals so I tend to go down the same aisles week after week.

Now I don’t have to wander down the cookie aisle trying to find the next thing on my list because we all know that package of Oreo’s is going to end up in my cart. Let’s be honest.

Once we moved back home it took me awhile to get used to the store’s layout, but once I did I noticed a huge drop in our grocery bill. I’m talking 20% savings just by creating my list in the order of the store’s aisles.

Try it. See how it works for you. I recommend it to everyone.