How to Use Google Drive for Your Check Register

I’m not going to lie, I’m obsessed with how to use Google Drive for your check register.

I love being able to create documents and spreadsheets that I can access anywhere with my laptop or phone.  My Google Drive is more organized than my closet with all of it’s sub-folders and color coding.  It’s beautiful!  Over the past few years I’ve learned how to leverage Google Drive to benefit me a little more.

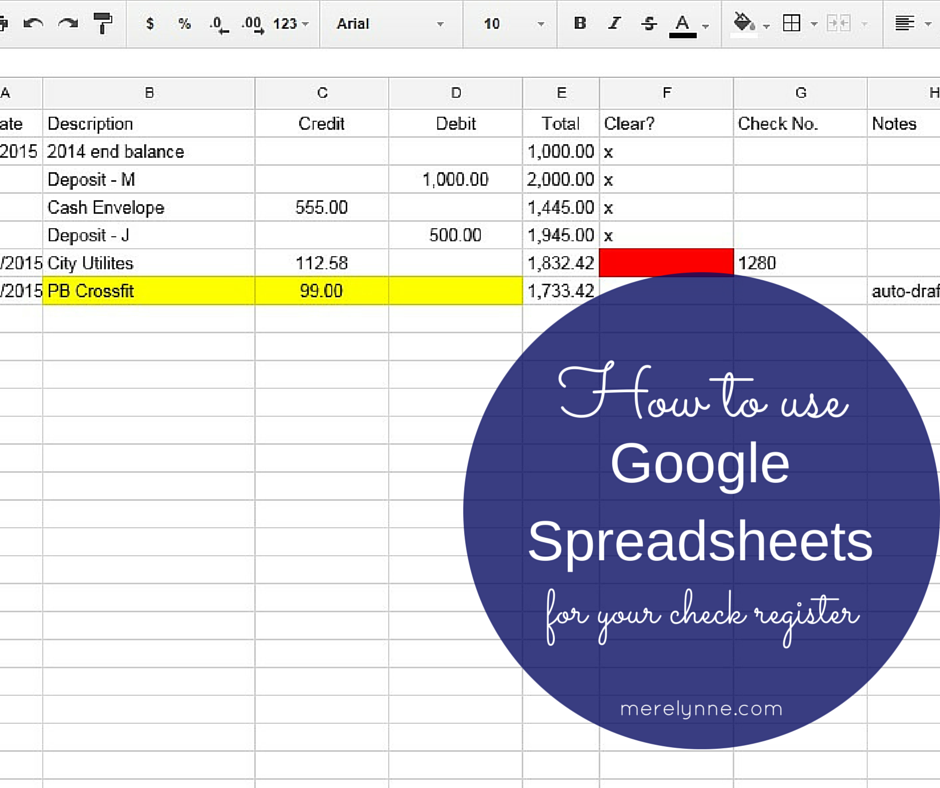
One feature that I use is Google Spreadsheets and I use it as my check register.  If you’re familiar with Microsoft Excel then it won’t be hard to adjust to Sheets.  I can have it automatically add or subtract amounts.  I can label columns and color code using the highlight feature.  I can quickly add any charges while I’m out in town or sitting down at home.  It’s quick, which helps me stay on track with keeping it reconciled.

how to use google drive as your check register

Here’s how to use Google Drive for your check register:

Create a new Sheet and label is check register (or whatever works for you).  I have ours labeled with the name of our bank, too.

Add headers to your columns.  Here are the ones I’m currently using and have been for almost a year now.

Date
Description
Debit
Credit
Total
Cleared
Check Number
Notes

how to use google drive as your check register

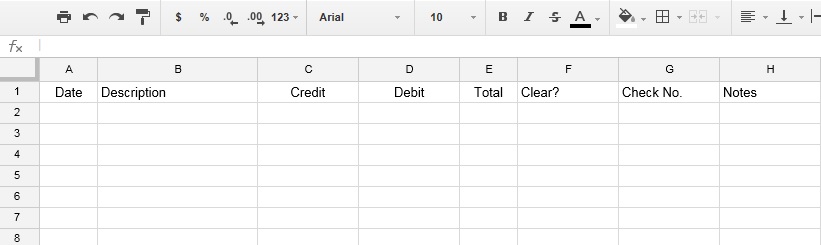
Here’s what a blank check register looks like for me.

I also like to color code.  That way nothing slips through the cracks.

how to use google sheets as your check register

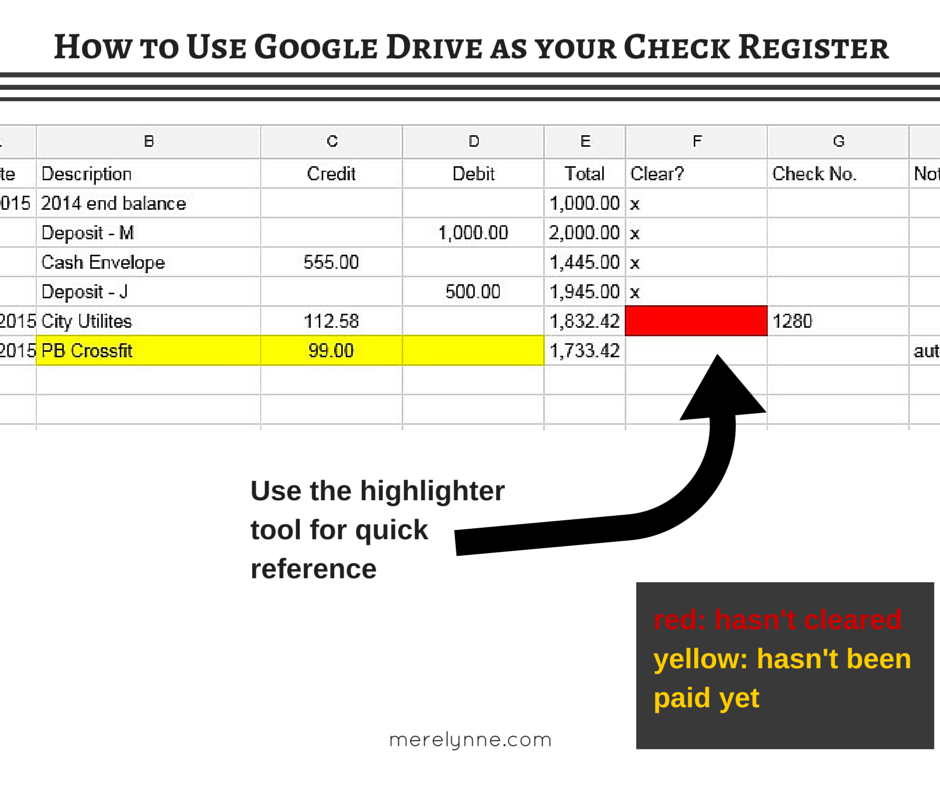
Yellow – a bill that isn’t due yet or a check that hasn’t been written.  We use the cash envelope system for a lot of our monthly spending, but not all.  We have auto-drafts setup for some bills, like – cell phone, DirectTV, gym membership, school loans.  I go ahead and enter them into the register on the 1st of the month, but they may not come out until the end.  I highlight them yellow so I know they aren’t coming out yet.

TIP: I highly recommend setting up auto-drafts whenever possible.  You’ll avoid mail delays, late payments and won’t have to remember to send it off!

Red – I use this color to highlight the “cleared” column.  That’s for any item that I’ve paid, but hasn’t hit the bank account yet.  That way I keep track of what’s come out and what hasn’t.

The notes section is for anything that’s out of the ordinary.  When we first moved we had to pay some deposits for our utilities.  So I marked those as deposits to remember down the road why it was an odd amount.

how to use google spreadsheets as your check register

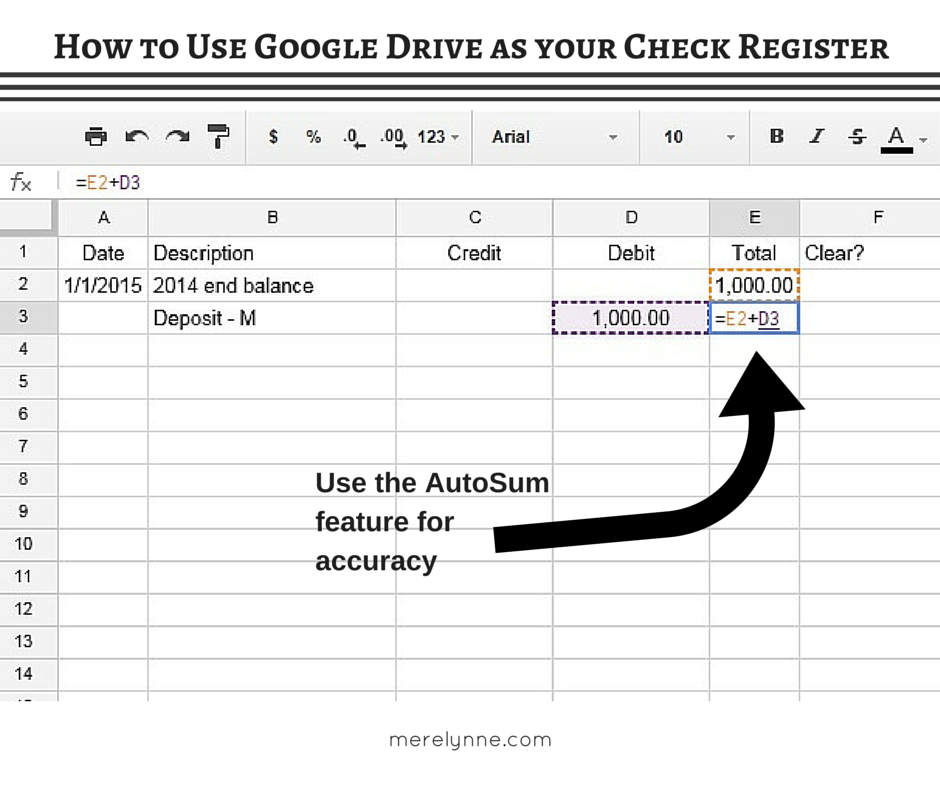
I love how Google Sheets (like Excel) has an auto-sum feature.  I can use the total column to add any debits and subtract any credits to automatically.  There are no mistakes by having it automatically do it for me.

I also love how easily accessible Google Spreadsheets is.  I downloaded the app to my phone, which is called Google Sheets and iPad so I can get to it anywhere, anytime.  Plus, it really helps keep us on track with our budget.

How I Meal Plan {FREE Printable}

how i meal plan, free meal planner template

Here’s how I meal plan, I’ve even included a free menu planner download to help you get started.

I have a confession.  I’m not the best cook in the world.  I’m not the worst.  But I’m so not the best.  I think to be the best at something you have to enjoy it and have passion for it.  For me, most days are a struggle when it comes to cooking.  It’s not that I mind it, but I just don’t always enjoy cooking.

I think that’s because most days I’m tired.  Work was long and stressful.  When I get home all I want to do is change into sweat pants and a baggy t-shirt.  I’m tired, I’m hungry and I’m starting to get cranky.  The last thing I want to do is be cooking for an hour before even getting sit down and relax.

I have found what helps me best to control my crankiness and our budget is to meal plan.  I have to admit our budget is looking a lot better since I started meal planning.  I keep it simple and easy, too.  I only plan for 2 weeks at a time.   To avoid being overwhelmed.

TIP:  Find easy recipes on Pinterest or list out ones you already know.  It makes preparing dinner 1000 times easier if the recipe isn’t complicated. 

Make your plan then write  a list of every ingredient you’re going to need.  Go through your freezer, fridge and pantry to check off what you already have.  That way you don’t buy something you don’t need.

Afterwards I make a master grocery list.  I plan ahead with using my favorite money saving apps and coupons.  Then

I go grocery shopping early Sunday morning or late Sunday night to avoid crowds.  I try to get everything we need for 2 weeks in one trip.  Sometimes I have to go back for fresh produce, but those trips aren’t costly.  I always make sure I have enough in our grocery budget by checking our cash envelopes.

meal planner - merelynne

Usually the breakfast section is just for me.  J has me buy those breakfast sandwiches and he tends to stick to them during the week.  On the weekends I like to cook a little something.  Right now with it being tax season and me working 6 days a week, Saturdays are pretty simple.

Same with the lunch section .  J tends to eat the same thing every day.  So I just make sure I buy enough for his lunches and he’s good to go.  I like variety so I use the lunch section more for me.  If we plan it right then I usually get to take left overs the next day to work with me.  That’s what L/O stands for.  If I know that I’m planning to take L/O the next day to work then I will make sure to make a little extra the night before.

Remember to keep your meal plan simple.  Don’t plan these elaborate meals, buy all this food and then not feel like cooking it.  That was my biggest fault.  I like what I see on Pinterest, but I had to be honest with myself.  If it requires chopping, sauteing, baking, and poaching in ONE recipe it’s not for me.

We also start our weeks on Monday.  I like to go shopping on Sunday afternoons (at least that’s what I aim for).  So by Sunday we’re pretty sparse.  By starting our week on Monday then I know exactly what I have left in the freezer and pantry, and what I need to buy.  I left the 2-week meal planner undated so you could start on any day that works best for your family.

As promised!  Here’ the 2 week meal plan template for FREE.  Click the link to open a PDF version.

2 week meal planner

two week meal plan

5 Secrets to Why Your Budget isn’t Working

5 secrets to why your budget isn't working

5 SECRETS TO WHY YOUR BUDGET ISN’T WORKING.

Sticking to a budget and paying down debt is hard.  It takes dedication and strength.  You must be willing to go without now so you can have more later.

You may go through phases with your budget.  One month you are strict with yourselves and your budget.  You know where every penny goes and you keep a watchful eye on your spending.  You even allocate every extra dollar to your bills.

In other months you slack off more. You go out to eat too much or you spend too much on groceries.  You don’t keep track like you should and you know it.

Those are the months that come back to bite you in the butt.

There’s a balance with paying down debt and budgeting that must be kept.  In order to be successful, you have to have order.

There are 5 secrets to why your budget isn’t working.  Over the years J and I have found what works for us.

SECRET 1: Don’t be too strict with yourselves.  Everyone needs to be able to spend money on something they want without worry. 

My mom told me this story right before I was married about a cup of coffee.  (I’m sure she read this or heard it somewhere, but it has stuck with me.)  A young boy and his brother were brought up by a single-mom.  The mom was struggling, but once a month she would make the boys a cup of coffee.  They could do whatever they wanted with that cup.  They could trash, drink it, give it away.  She never asked questions.  It was theirs.

Everyone needs a cup of coffee of their own.  You need some money that you’re able to do whatever you want with.  No questions asked.

You have to decide what that is between you and your spouse.  J can save his money to go the boat (casino) and I don’t care if he blows it all.  I can spend my money on shoes, getting my nails done.  Whatever.

We make it fair.  We each get a specific amount to spend.  Part of mine goes towards Crossfit so I end up with less cash than J does each month.  J spends some of his money on breakfast burritos.  It doesn’t matter.  We do not care what we spend it on.

SECRET 2: You’ve lost your motivation.  

Money is stressful.  Bills are stressful.  Sometimes you get overwhelmed and start to lose focus.  You need to be reminded why you are following a budget.

I recommend pulling out your debt snowball information or your budget.   Look it over and remember why you are doing this.

SECRET 3: You’re spending too much in one area.

You need to check your budget on a monthly basis (or more!).  Make sure you aren’t spending too much in one category and coming up short in another.  If you’re cable bill is over $100 and you struggle paying for gas to get to work then you have a problem.  Look at cutting your monthly expenses to free up money where you need it.

SECRET 4: Realize that media is affecting you.

Commercials, advertisements, social media are made to influence consumers.  Everyday people are bombarded with outside influences that scream “buy me!”  You have to realize this and think hard before purchasing.

Everyone needs a cooling off period when mad or overwhelmed.  So why not do the same when buying something?  Don’t let the cute little kid pushing Halos on TV influence you to buy them.  Especially when no one in your family will eat them!  You have to be smarter than Marketers.  It’s hard, they are good.  So good.

I recommend taking cash with you when shopping.  They way you spend what you have and nothing more.

5 secrets to why your budget isn't working

SECRET 5: You’re not prepared.

You need to think like a boy scout – always be prepared.  That’s why having an emergency fund is critical when paying down debt.

I remember when J and I were on a roll with paying down debt, we woke up to our fridge going out.  I worried about paying our bills and not being able to buy food.  At that point, J  reminded me about our emergency  fund.  We had a little over $1,000 in that account.

We went to a discount appliance store, you know the kind – scratch and dent.  We found a great fridge for a fraction of what the other stores were charging.  It had a few scraps down the side, but the way our kitchen is, you can’t even see them.

There was no struggle.  Every bill was still paid.  We were still able to eat.

You must be prepared for the unexpected.

There you have 5 secrets to why your budget isn’t working for you.  Now you have the ins and outs of making a budget work for you.  


The Best Chicken Casserole Recipe

the best chicken casserole recipe


The best chicken casserole recipe is right here.

It takes a lot to declare something the best.  I realize that, but TRUST me.  This recipe fits the bill.  J even ate 3 plates.  It’s that good.

the best chicken casserole recipe

If you’ve ever had tuna casserole then it’s an improved version.  J loves my tuna casserole recipe, but I don’t like tuna.  So he rarely gets it, which is not fair to him.  This past week I had a late meeting and needed a quick recipe for dinner.  I thought about a tuna casserole, but quickly nixed that idea.  Then I thought about grabbing food on my way home, but J and I trying to stick more to our budget.  So that was out.

the best chicken noodle casserole recipe

I came home and was really thinking about this tuna casserole idea.  I wondered how it would be if I swapped chicken for tuna.  I found my old recipe and made some changes.  It came out to be the BEST chicken casserole recipe.

Ingredients:

16 oz. of cooked chicken breast, shredded
1/2 bag of egg noodles, cooked and drained according to package
1 can of cream of chicken soup, you could use a cream of mushroom soup too
1 1/2 c. milk, I used unsweetened almond milk
1 tsp. salt
1 tsp. pepper
1 tsp. garlic pepper
2 cups shredded mozzarella cheese
1 cup pita chips, crushed

Preheat your oven to 350 degrees.  Grease a square pan and set aside.

In a bowl, mix together cream of chicken soup, milk, chicken and seasoning.  Add cooked noodles and stir to combine.  Add 1 1/2 cup of cheese and mix well.

Pour mixture into greased baking pan.  Top with remaining cheese and crushed pita chips.  Bake in oven for 30 minutes.

NOTE: If you don’t have pita chips, any crackers will work.

the best chicken casserole recipe

We barely had any remaining.  I also wasn’t sure if this one would turn out so good.  That’s why the pictures were taken after we ate half of it.  Oops!

Trust me this chicken casserole recipe is amazing!

the best chicken noodle casserole recipe

I mean, look at all that cheese! Yummy!


Tips on doing the debt snowball

The Debt Snowball is a tool to help families and individuals pay down their debt.

The end goal is to be debt free.  If you’ve heard of Dave Ramsey then you’ve probably heard of the debt snowball before.  I wrote a post on it before, but it’s been a long time.  I think it’s time to go over it again.

debt snowball tips, how to do the debt snowball

It’s a simple concept.  Start with one debt, work your way to paying it off by putting any extra money towards the debt each month.  When that debt is paid in full, you take the money you were applying towards it and roll it into another debt.  You continue this snowball effect until all bills are paid off.

It’s important to continue paying the minimum payments on your other bills while building your snowball.  

It sounds simple, right?  But there is much more to it.  First you need to decide which bills to pay off.  Second you need to decide on an order.  Third you need to find extra money each month to allocate towards the bill.  Fourth you need to actually put the money towards the bill.

Before you start on your debt snowball it’s important to build your emergency fund.  It’s not going to help you if you get hit with an unexpected bill.  You will be working hard towards getting out of debt just to put yourself right back in the thick of it.

Let’s start with the first step: knowing which bills to put in the debt snowball.

The snowball effect is open to ANY debt.  I mean it.  Any debt you have can be paid using this tool.

Here’s a list of what we currently have:

1) credit card
2) personal loan
3) truck loan
4) school loans
5) furniture store credit card

You could also have:

1) loan from a family member
2) health care expenses
3) anything

Next is step two: decide on the order of your bills.

This step is a bit more complicated.  You could follow Dave Ramsey’s advice and start with the lowest balance debt first.  Then work your way through your debts.  I do it a little different.  I also take into consideration the interest rate.

Here’s an example:  J has a furniture store credit card debt.  He got a promotion of 0% interest for the life of the debt as long as he doesn’t miss a payment.  Pretty sweet deal, huh?  I have a credit card with a little higher balance (less than $2,000).  I have an interest rate of 18%.  It makes more sense to me to pay down the credit card first.  I will be hit with interest charges each month I carry a balance.  The furniture store debt has zero interest.

I think it’s best to look at interest rates.  If it’s complicated or you just don’t want to think about it.  Then follow Dave’s plan.  Start with your lowest balance debt and work your way forward.

Step three: find extra money to allocate each month.

You should have created your budget and started using the cash envelope system already.  If you are then you should have no problems finding extra money each month.  It doesn’t have to be a lot.  An extra $50 will make a huge difference.

For instance, your credit card’s minimum payment is $75 each month.  You were able to find an extra $75 a month to put towards your bill.  Now you’re able to pay $150 per month.  Your debt will start to decrease quickly!

tips on doing the debt snowball, how to do the debt snowball

The fourth step: actually putting the money towards the bill.

If you make a plan and don’t stick to it then you won’t get out of debt.  I like to immediately put the extra money to our debt the moment it hits our account.  That way we can’t accidentally spend it on something we don’t need.  By having an emergency fund built, if something comes up then we are covered.

Once a bill is paid off, keep that extra money allocated to bills.  Don’t relax and start pulling money away.

Let’s use the example above.  Your credit card is paid off because you’ve been putting $150 towards each month.  Now it’s time to move on to your personal loan.  Your monthly payment is $130.  Now you take the $130 and add the $150 to it.  Now each month you’ll pay $280.  Boom!  You’ve more than doubled the minimum payment.

These bills will be paid off in no time!

Does the debt snowball actually work?  Yes.  You have to be dedicated to it.  You have to be honest with how much debt you’re in.  You have to want to be debt free.

Here’s the workbook I personally use, soon to be debt free.  It’s from One Beautiful Home Blog.  Yes, I could have created my own workbook, but why?  This one is great!  It has all the benefits I was looking for.  Now I didn’t need all of it.  I didn’t print every page.  I only printed the paycheck schedule, payment tracker, debt priority list, and enough snowball calculators for each one of our debts.

Dave Ramsey has a pretty nice debt snowball tool on his site.  If you need more information, then I suggest checking it out.

Fitbit Flex vs Fitbit Charge HR {My Review}

fitbit flex vs fitbit charge hr, review of fitbit

Activity trackers are all the rage right now.  There are ones that track your steps, your sleep, your heart rate, the number of stairs you take, and even vibrate whenever you put chocolate to your lips.  I kid, I kid about the chocolate warning.  But seriously these trackers can do some amazing stuff!

I’ve worn both the Fitbit Flex and the Fitbit Charge HR (HR stands for heart rate).  I started small with the Flex for a few months, but then upgraded to the Charge HR a few weeks ago.  I gave the Flex to J to wear so he and his family could do challenges against one another.  I’ve never seen a more competitive family than his.  They call and text about each other’s steps or when someone is slacking.  It really keeps him motivated trying to beat his sister all the time.  I guess I won’t complain since he’s moving!

I upgraded for a few reasons – first, I really wanted J involved and it was easier to tell him that I wanted a different one and he could just take my old tracker.  That way I wasn’t spending money specifically for him and he knew that eventually I would upgrade.  Second, I Crossfit.  If you’re familiar with Crossfit at all then you know it’s not a lot of walking around.  I mean it’s hard work, but I’m not running across the gym the whole time.  There are a lot of movements where I’m standing in one place deadlifting or cleaning.  The Flex is not going to track those movements very well.  I kept finding myself done with the workout feeling like I just had my butt handed to me.  I would check the tracker and it would say 40 steps.  It was frustrating.  I needed something that would tell me more about my workout.

fitbit flex vs fitbit charge hr, review of fitbit

I really liked the ease of the Fitbit Flex, their app and even their customer support.  I had a problem when I first got the Flex (mainly because I think I have the Samsung Galaxy S5 Active and it wouldn’t sync all the time) and I e-mailed support.  They were great!  Explained everything well and were willing to ship me a new tracker, no questions asked.

I researched different products and thought the Charge HR would be a good fit.  Of course it was on back order for 3 weeks.  That was kind of a bummer, but it was worth it!

Here’s my honest reviews on the Fitbit Flex vs Fitbit Charge HR:

Flex:

Pros:

– less costly at only $99
– tracks steps and sleep
– holds a 4-5 day battery charge
– syncs with J’s Samsung S4
– fully charges in 2 hours
– more slender design so it doesn’t bother me as much
– easily gauge your progress with progression dots on the tracker
-easy to read desktop dashboard on the computer

Cons:

– not as in-depth as the other trackers
– if your activity doesn’t involve a lot of walking than it won’t be accurate
– difficult to switch into sleep mode sometimes
– didn’t want to consistently sync with my Samsung Galaxy S5 Active
– hard to track certain activities (such as weightlifting)
– doesn’t tell time

fitbit flex vs fitbit charge hr, review of fitbit

Charge HR:

Pros:

– more in-depth tracking capability, such as: heart rate, number of stairs climbed, can pinpoint a specific activity
– automatically goes into sleep mode when it senses you resting
– fully charges in an hour and a half
– vibrates and scrolls name of someone calling me
– tells the time, exact number of steps, current heart rate and amount of stairs I’ve climbed directly on the tracker
– seems to be more accurate with the amount of steps I walk in a day
– easy to read desktop dashboard on the computer

Cons:

– bulkier wristband, it takes some getting used to after wearing the flex for a few months/
– only a 3-4 day batter charge, but still not bad
– to go along with the call notification, it seems to alert me on the last ring so I usually miss the call anyway (but I have a habit of leaving my phone on silent, so that’s nothing new)
– more costly at $149

 fitbit flex dashboard, fitbit flex vs fitbit charge hr, fitbit review

Here’s a comparison of what the Fitbit Flex dashboard looks like to the Fitbit Charge HR dashboard.  You can see there is more options and in-depth tracking with the Charge HR.  Now you can pick and choose which tiles you want displayed.  The Flex is J’s from a few days ago.  See, he walks a ton compared to me.  The Charge HR is mine from a few days ago.  I blocked out my friends’ pictures and names just to be nice.  I don’t walk nearly as much as J!

Overall, I am glad with my Charge HR purchase.  I was willing to pay more for a tracker that offered more features.  It was also a win-win because J now wears my old Flex.  He walks so much more than I do in a day, but now I find him moving a little more in the evening to stay even with his sister.

My Favorite Money Saving Apps

money savings app

I love saving money and I hate spending money.  Makes sense, right?

J and I work too hard to just blow our money away.  Don’t get me wrong, we like to have fun and don’t deprive ourselves.  We’re just smart with everything.  We have our budget that stick to.  We update it every 2 weeks when we get paid so we stay on target.  We also use the cash envelope system so we don’t over spend.

Another way I save money is shopping apps that I’ve discovered.

I broke down my favorite money saving apps to share with you.  I personally use all of them so I have firsthand experience with these.  I did find them from various sites like The Krazy Coupon Lady and Coupon Wizards.

Snap by Groupon

Snap lets you shop at any store, which is nice.  All you have to do is download the app then shop like normal.  Select the items you’ve purchased that are listed on the offer page then upload your receipt.  Once they process it your account will be credited.  Cash out once you reach $20.

money savings app

You can redeem multiple offers with one receipt!  I like to check the offers to see if I can substitute any brands for what is being highlighted that week.  That way I can really bulk up my rewards.  Join Snap by Groupon using my referral link

Walmart Savings Catcher

This one might be the easiest one out there.  Once you’ve shopped at Walmart, just upload your receipt to the app.  That’s it.  They do the work to scan for nearby savings and sales.  If an item you purchased is on sale then it will credit your account.  You can transfer the money onto a gift card to be used for future purchases.

money savings app

Don’t expect a huge refund every time you shop.  The first time I used the Savings Catcher app I add a credit of $0.66.  That was on 3 items, too.

ShopKick

This one is super convenient.  ShopKick doesn’t even require you to actually purchase anything!  You can earn kicks from walking into a store, scanning products on the shelve and of course, purchasing.

money savings app

Here’s how it works:

1) walk into a store and open the app
2) click “find nearby kicks” to see what is available.
3) scan item barcodes.  Next to the item there will be a number with amount of kicks you can earn

Kicks = money.  The money can be exchanged for merchandise and gift cards.

Click here to join ShopKicks (this is my referral link).

Ibotta

Ibotta was the first money saving app I downloaded.  The tagline “better than coupons” stuck out to me.  Ibotta allows members to shop online, submit a receipt and link a store loyalty card to your account.  You need to unlock rewards before you go shopping.  Again, this is where I like to see what brands their offering a deal on and if I can switch what I’m buying.  Sometimes you have to watch a video, take a poll, or other simple tasks.  Once you have unlocked the reward, you need to verify the product by scanning your barcode and have to upload your receipt.

money savings app

They deposit cash into your account.  You can transfer your reward money into your Paypal account.  If you don’t have a Paypal account then you can have it given to you in form of gift cards.  Click here to get Ibotta (this is my referral link).

Checkout 51

Checkout51 is another new money savings app that I like.  It’s very similar to the others.  You purchase items listed, scan the receipt to prove you bought it and the date it was bought.  Money is then credited to your account.  Once you hit $20, you can cash out.  I like Checkout 51 because a lot of times it’s not brand specific.  Purchase bananas?  Get a $0.25 credit.  Purchase any type of yogurt?  Earn a $0.50 credit.  It’s pretty nice.

I love using all 5 of these money saving apps together.  When the stars align with my coupons working, the apps offering rewards and the items being on sale is a beautiful thing!

Pizza Inn Chocolate Chip Pizza Recipe

Note: Some links in this post contain affiliate links, which means I may receive a commission if you make a purchase. Thanks for supporting my blog!

pizza inn chocolate chip dessert pizza recipe

I love Pizza Inn’s chocolate chip dessert pizza.

I have an obsession.  It’s not healthy, but I can’t stop myself.   It’s delicious.  I have to limit myself, it’s that good.

A few weeks ago J and I planned to go to my parents to watch a game.  Mom was making snack foods so I agreed to bring dessert.  Chocolate chip pizza was the only thing I could think of.  It had been awhile for me and I needed my fix.

I scoured online and found a few different recipes.  I decided to combine two recipes.  I feel my recipe is a legitimate Pizza Inn chocolate chip pizza recipe.

Pizza Inn Chocolate Chip Pizza Recipe

–  baking pan, you can use either round or rectangle.  Just make sure it’s on the large size.  I used this pizza pan set, which is a favorite because with a little Pam, nothing sticks to it and it’s super easy to clean.
–  1 THIN pizza crust in a can
–  2 sticks of butter, melted
–  1 box of yellow cake mix
–  3/4 bag of milk chocolate chips
–  1/4 cup brown sugar
–  1/4 cup granulated sugar

Preheat your oven to 400 degrees.  Spray nonstick cooking  on the pan (I use one made with coconut oil).  Spread crust evenly on pan. Follow can instructions for pre-baking crust.  Mine said to bake for 5 minutes.

While your crust is baking, grab a bowl.  Stir together sugars with a fork to break up any lumps.  Set aside.

Remove crust from oven and set aside.

TIP:  If the crust has any air bubbles after pre-baking, poke with a fork.

Mix together melted butter and yellow cake mix.  There will be a few lumps in the batter.

pizza inn chocolate chip dessert pizza recipe

Spread cake mixture onto the crust.  Leave approximately ½ inch from the edge without any batter.

Sprinkle the chocolate chips on the batter.  Using the palm of your hand, lightly press chips into that batter.

pizza inn chocolate chip dessert pizza recipe

Sprinkle sugar mixture over pizza.  Cover batter and chocolate chips, but avoid the edges of the crust.  You may not need all the sugar mixture.  I used it all to make sure it was covered completely.

Bake for 7-12 minutes.  I would check at about the 7 minute mark and then keep an eye on it every 2 minutes thereafter.

pizza inn chocolate chip dessert pizza recipe

If after 12 minutes the top hasn’t browned then switch to broiler for 1 minute.

TIP: Do not walk away from the oven if you switch it to broiler.  It will burn!

Remove the pizza from the oven and let cool for about 5 minutes.  Cut, serve and enjoy!

If you make the pizza ahead of time then heat the oven to 350 degrees before serving.  Place the pizza in for about 2-3 minutes until chips melt.

What is your favorite dessert to share?

Snow Day Fun

Snow, I want to wash my hands, my face and hair with snow

southeast missouri, dogs playing in snow

Do you know what happens when a town gets hit with over 7″ of snow on top of a thin layer of ice?  It shuts down.  Especially when that town is not prepared for it, at all.  That’s what happen to us this past week.  So come Thursday morning we enjoyed ourselves a little snow day.

Of course we’re adults, so we had to put in a few hours of work early in the morning.  Afterwards we came home and relaxed.

Actually this exact same thing happened a few weeks ago.  J and I were both off for one day then and now I’m off for 2 days this week.  Poor J had to go to work Thursday morning.  I was pretty worried about him being out in town driving around.  But he made it!

all three playing 2015 Bud in the snow 2015

We let the dogs have a little snow day fun in the backyard.  Bud was the happiest of all.  He ran, jumped, dug and rolled around in the fluffy white stuff.  Tiny was reluctant to let loose.  Once I was outside with her, she finally started to have fun.  Of course, Maggie did her own thing for pretty much the whole time.

The most fun was when the stole my gloves to play tug of war with.  That was great.  My favorite part was when Bud buried one of my gloves.  Yep, buried.  Isn’t that great of him?!  It took me close to 10 minutes to find it and dig it up.  Boo!  He had so much fun trying to beat me to finding the glove.  All he did was bury it deeper, too.

Ugh!

Were you hit with any snow these past few weeks?  We were hit more than average for this time of year with record lows.  I can’t wait for summer!

Slow Cooker Pineapple Teriyaki Chicken Recipe

pineapple teriyaki chicken recipe

I love a good slow cooker recipe, which is why I’m a fan of pineapple teriyaki chicken.

Ever get in a food rut?  You know when you find yourself cooking the same dishes over and over.  When that happens you find yourself eating out more than you want.  Then your food choices start to slip back to bad habits.  That’s what was happening to J and I.  We were in a food bore.

I needed to shake things up.  I came across a few slow cooker recipes and  that’s when the light bulb turned on.  In the true-to-myself fashion I combined some recipes to make my own.  That’s how the crockpot pineapple teriyaki chicken recipe came to be.  I’m sure I’m not the first person to come up with it, but I’d like to think I’m special.

NOTE: This slow cooker chicken recipe is amazing and super simple.  

pineapple teriyaki chicken recipe

Here’s what you need to make this delicious pineapple teriyaki chicken recipe:

  • 4 chicken breasts
  • 1/2 bag of carrots (I used organic baby carrots)
  • 1 large can of pineapple in 100% pineapple juice, undrained
  • 1 cup teriyaki sauce
  • 2 tablespoons brown sugar (optional, but makes it sweeter)
  • 2 tsp. garlic powder
  • 2 tsp. onion powder
  • 1 tsp. salt
  • 1 tsp. pepper

Place the chicken in the bottom of the slow cooker.  Add the seasonings.  Pour the pineapple and juice over the chicken.  Be careful to not wash off too much seasoning from the chicken.

Add the carrots to the slow cooker.

In a measuring cup, pour out 1 cup of teriyaki sauce and mix in the brown sugar.  Pour over chicken.  Place lid on and cook on low for 7 hours.

pineapple teriyaki chicken recipe

NOTE: You could always use 1 small red onion and 4 garlic cloves instead of the powder.  But J does not like onion so when I do use it, I tend to cut it in big chunks so it can be removed.  I didn’t have any onion or garlic on hand so I substituted the seasoning.  It tasted fine to us!

Voila!  There you have it.  A simple chicken recipe that packs a load of flavor.