Note: Some links in this post contain affiliate links, which means I may receive a commission if you make a purchase. Thanks for supporting my blog!
I’ve been getting asked how did I start my blog, why did I start it and how do I know what to write about. So I thought I would finally sit down and tell you a little bit of back story. Then I thought I would share a step-by-step guide on how to start your own blog – a self-hosted blog that is! It all started back in 2008 when I wanted something more to do because going to school full time and working full time just wasn’t enough. HA!
I started with a DIY blog and I created loads of crafts and recipes. It was going great, I had made some online friends back before Twitter was big and way before Instagram was around. I even hosted a few guest series and was featured as a guest on a few different blogs. I liked writing and sharing, but the thought of coming up with another DIY project on a college girl’s budget was just draining. It started to feel more like a job and less like a fun hobby. I wasn’t making money and it was costing me quite a bit of my going out money. So I lost interest.
Flash forward 2 years and I was back. I had created a new brand – merelynne.com and jumped in feet first. I decided to not label myself as one specific type of blogger. I had seen some bloggers call themselves a personal lifestyle blogger, so I took the title and ran with it. I would write about what I wanted, when I wanted. I focused on fashion, recipes, DIY projects and just simply sharing what was going on in my world.
Over the years my blog has shifted and I now write about what I’m passionate about – finances, mommy things, and recipes. The blog look has definitely changed over the years too. Today it’s much more simplistic. I’ve learned a lot since I first started over 8 years ago. I think it’s time to share what I’ve learned with you.
When I first started out I was on blogger and it was okay, but I wanted more. I wanted to be able to have plugins that could help me with SEO, social media and just give me more of a customized feel. Blogger wasn’t capable of that at the time. Years ago I made the switch to WordPress and I’ve never looked back.
WordPress is what I’m comfortable with it and what I would recommend to any new blogger. They have plugins, which are tools created to help you. There is a plugin for just about anything and everything. I have one for SEO optimization, social media sharing, spam comment blocker, and many more.
There are other options besides WordPress and Blogger. Another one is Typepad, but I haven’t used it before.
After you decide where you want to be, the next step is choosing a domain name. You want something that describes your blog or you, plus you want something that is easy to remember. My name came from a portion of my first name and my middle name – Meredith Lynne.
Once you have a domain name selected, I would highly recommend purchasing that domain. There are good reasons to purchase your name. First, to make sure no one else has it. Second, to own it. In case it takes off or you decide to make it a business then owning the name is vital. I like the fact I own my name. I don’t have to worry about building this blog for years then realizing my blog name is already taken.
I use Go Daddy to purchase all of my domain names. They have pretty good deals and it’s very easy to use.
I also recommend to all new bloggers to self-host their blog. It sounds complicated – self-hosting, but it’s not. I use Bluehost for my blog and I’ve never had a problem with it. What I love most is their awesome customer service. If I ever have a question they respond quickly with helpful advice. I can even tweet to them and they will respond within minutes typically. It’s rare to find a company with such great customer service, which is part of the reason I’ve been with them for so long. The other reason is the ease of use. Setting up my blog was painless.
In addition, [eafl id=4687 name=”” text=”Bluehost”] offers a free email email address with a hosting package. I can add more emails later if I need to, but I like having one as my contact source for all blog related messages. I have it forwarded to my gmail account, but I can reply as my domain email so it seems more legitimate to businesses that I reach out to for sponsored posts and guest posts.
Also Bluehost gives you a free domain name with your hosting package. So you can skip using GoDaddy.com and get it all in one stop. Back when I purchased a domain, it was easier to use Go Daddy for it then [eafl id=4687 name=”” text=”Bluehost”] for the domain. But now they have made it a lot easier and a one-stop shop, which is so nice!
Setting up a self-hosted blog doesn’t cost as much as you think!
Deal Alert: Bluehost even has a special deal for my readers who are starting out. You can get a killer hosting deal for only $…. It’s a great opportunity and hard to find a hosting service this inexpensive. Since I love a good deal I thought I would pass it on. So if you’re on the fence, it’s time to hop on over and get started. You never know where your blogging dreams can lead you!
[bha size=’468×60′ variation=’01’ align=’aligncenter’]
I’m hoping they will allow me to keep offering this deal for a long time, but you never know. So don’t miss your chance to save some money!
Please note that Bluehost bills upfront for their hosting services. There is one big reason to pay upfront:
Make sure you don’t come across any issues that can stop your blogging from being set up. When I was first starting out I was on a college girl’s budget and the thought of a one-time expense scared me. So I opted to do the monthly payments. Then a few months in my card expired and I received a new one. I didn’t remember to go into my account and switch the card number. I came way too close to losing all of my hard work. As soon as I realized what I had done I switched to an annual payment and have never looked back.
Once you have your hosting setup it’s time to get started. I’m going to walk you through the steps I took to start this blog. I promise it’s not hard.
How do I know what to write about:
Well as I’ve changed over the years so has my blog. Like I mentioned earlier I used to be a DIY project kind of gal. Now I’ve shifted to talk more about what I’m passionate about. I like to share topics on budgeting and finances, easy-to-prepare recipes, and what being a new mommy is really like. I keep a running list of post ideas on my phone so whenever an idea strikes I can write it down to save it for later. I constantly am circulating through ideas. Some are really good and others never get finished.
When you’re trying to think of what you want to write about remember one thing – It’s your blog, so do what you want! You can literally write about whatever you want: your passion, interests, family, career, anything!
You have to realize that the sky is the limit. You can grown your blog, your site and your dream to be as big as you want. Because you are only as big as you dream. (Tweet that!)
Can you make money from blogging?
Yes, yes you can. I don’t share what I do on here, but I’m thinking that’s going to change very soon. I’ve never been very focused on creating an income from this blog, but I know the potential is there and I think I’m finally ready to tap into it. You can join ad networks, affiliate programs, hosts sponsored posts, and so much more. I take part in all of these, but have never really followed through with them until recently. It’s going to be exciting to see where this blog can take me.
How to start a self-hosted blog on Bluehost, a step-by-step guide:
Let’s get into the nitty-gritty of the post, setting up your blog. Here is an overview of the process.
1. Open a new window or tab in your browser. That way you can keep this guide handy through the whole process.
2. Decide on a blog name. Remember to make it something that describes your blog or describes you. You want it to be easily remembered and easily spelled.
3. Purchase your domain from GoDaddy.com. The first step in purchasing is making sure the domain is available. Then once it is you can buy the domain straight from GoDaddy. I have step-by-step instructions below on this process, too.
4. Get a hosting package – I recommend to all newbie bloggers to go with a company that is well trusted and reasonable priced. I personally use Bluehost and would recommend them to anyone starting out. Don’t forget about the hosting deal you can get by going through my link.
[bha size=’468×60′ variation=’02’ align=’aligncenter’]
5. Install WordPress with one click. Bluehost actually offers a service to bloggers that allows a one-click install. Within minutes your new website will be up and running on WordPress, which is the best blogging platform in my opinion.
6. Purchase and Install a theme. The theme is the look and feel of your blog. WordPress has free ones you can install to get started, which is what I did for a long time. You can also search for paid themes that are more customizable.
Step-by-step Instructions to Purchase a Domain from GoDaddy.com
1. Go to GoDaddy.com and type your wanted domain name into the search bar.
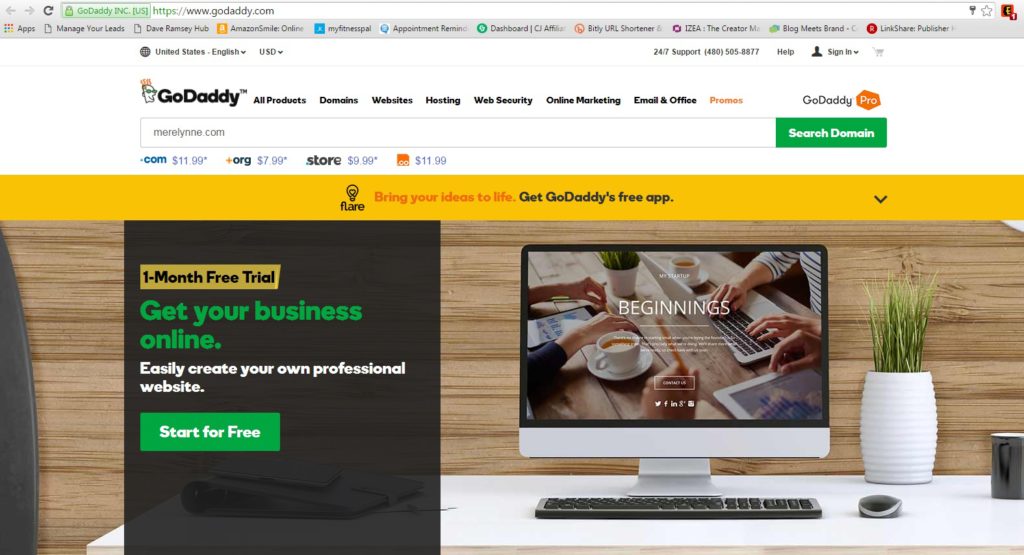
2. If the domain is available you will see, Yes! Your domain is available. You will also be given the opportunity to purchase the .net, .org, .us, and .info domains as well if you want. That’s up to you. Buy I would highly recommend purchasing only the .com version. That is the most common and most recognizable.
3. Click Select, then click Continue to Cart at the top right.
4. Another option you have when purchasing a domain is if you want to make it private or not. It’s an extra fee and it means that if someone is searching for the domain they will not be able to see your contact information. I don’t have mine set to private since I don’t imagine anyone wanting to spam me or offering to purchase my domain name. I would also skip over the Linux Web Hosting and Website Builder options. Bluehost will offer an email to go with your new account, so skip over the email address too.
5. In the cart you will have the option to select the term length for your domain name. I started with 1 year to make sure I was really committed. After the first year you can change it to be longer.
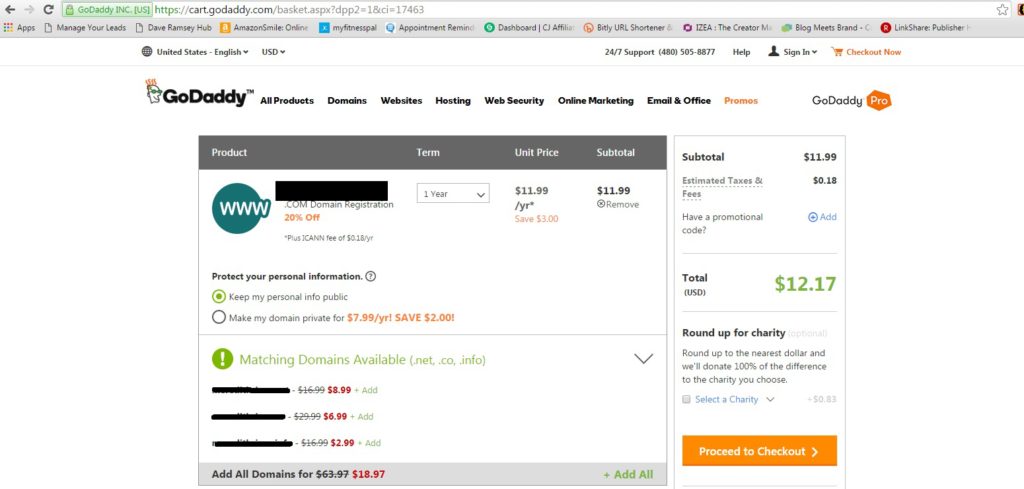
6. Make sure the spelling of your domain is correct then proceed to checkout. You will need to create an account and enter your credit card information.
Step-by-step Instructions for Bluehost blog Setup
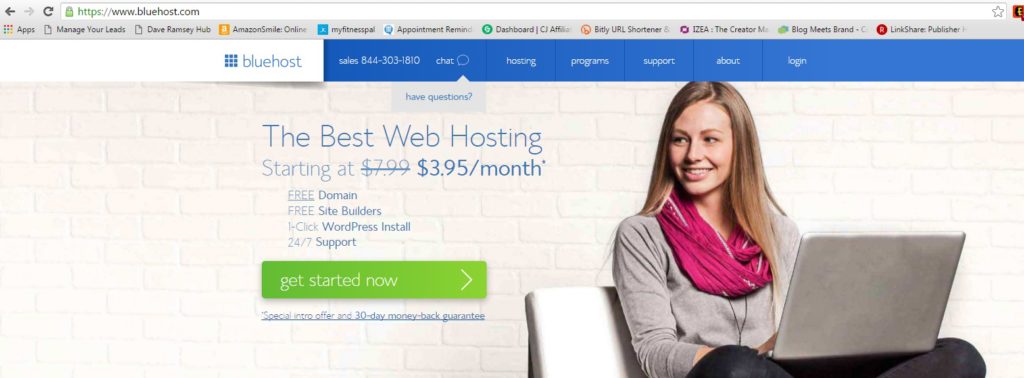
1. Head on over to Bluehost.com and click the green “get started now” button.
2. Bluehost also offers a chance for a domain name as well that is included. You can go with this instead of purchasing one through godaddy.com. I have one here, but I also purchased one through Go Daddy as a forwarding web address to my blog.
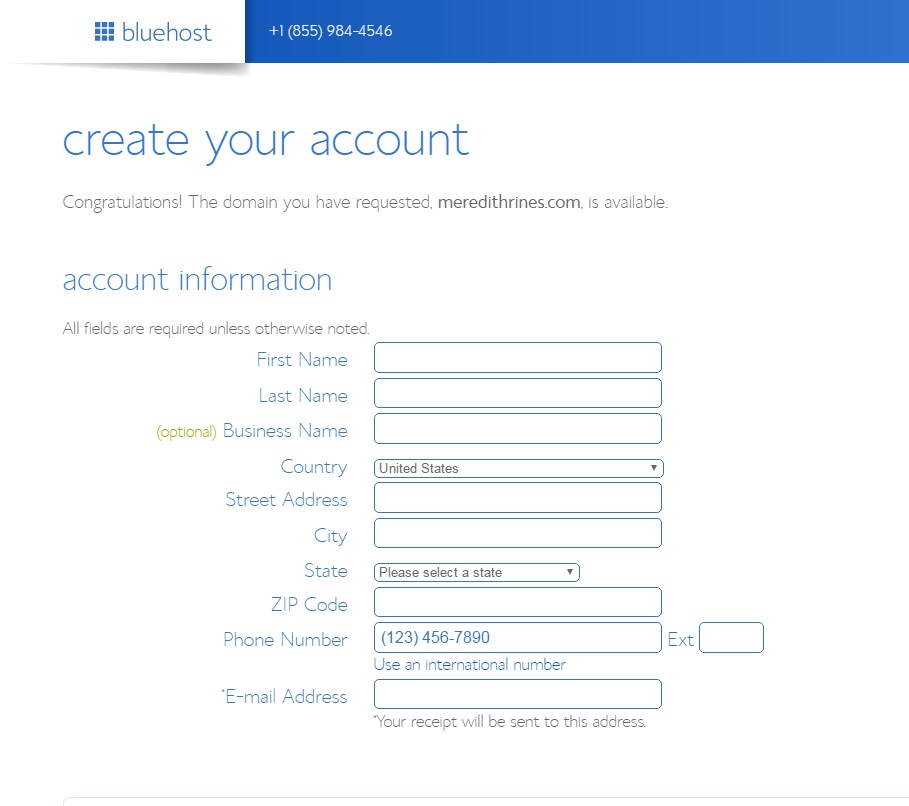
3. Enter your account information.
4. Choose which hosting package you want. Normally, hosting is offered for 12, 24 and 36 months. The longer the hosting package then the cheaper the per month price is. I personally went with the 12 month package my first time because, again, I wanted to make sure I would commit to this blog. However, it is up to you. There are other package options, but I didn’t select any for myself and I haven’t regretted it.
Side note: backing up your blog is important, but WordPress offers plugins that you can do this with and that is what I would recommend.
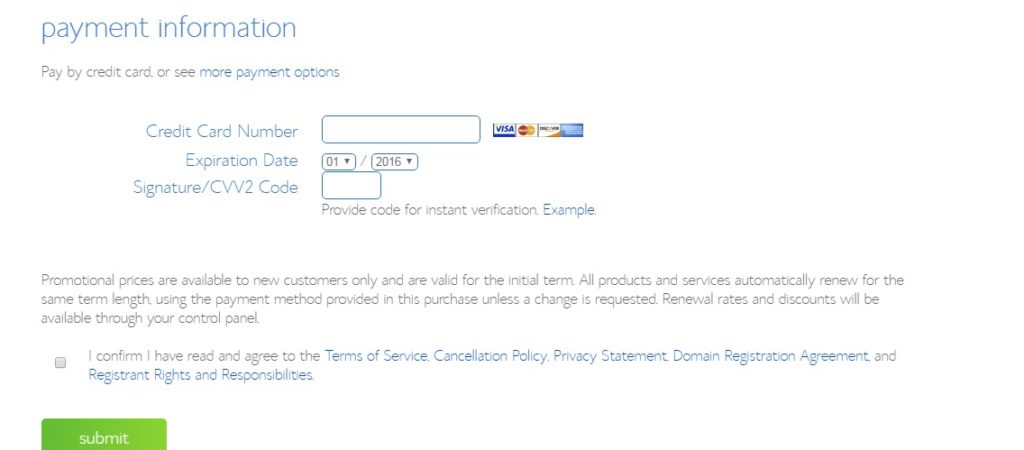
5. Enter your payment information and click submit.
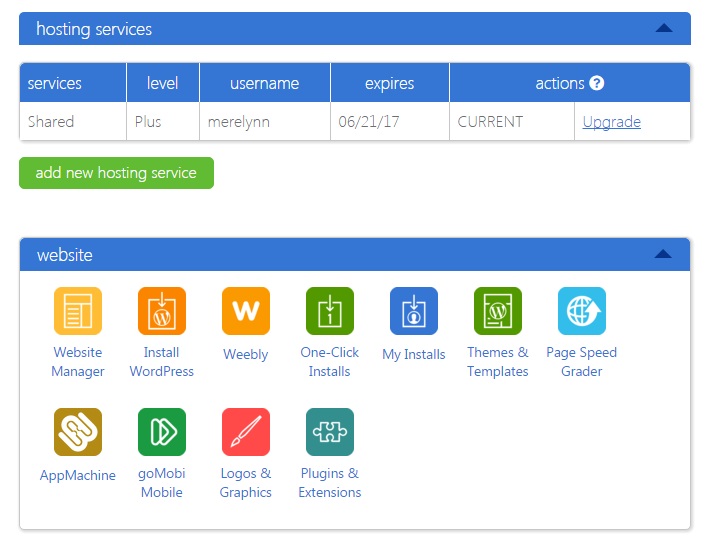
6. Your account is setup and you can get started installing WordPress. Bluehost has a great service that allows you install WordPress with one-click. It’s amazing!
7. Navigate to your Account Dashboard and look for the “Install WordPress” button.
8. Once you have clicked the button you will see the installation screen. Click “Install” to begin installation. You can pay a fee for WordPress Starter, which will get you a theme credit and installation, but that’s up to you. It’s not difficult since you’re starting from scratch and I like to save as much money as I can.

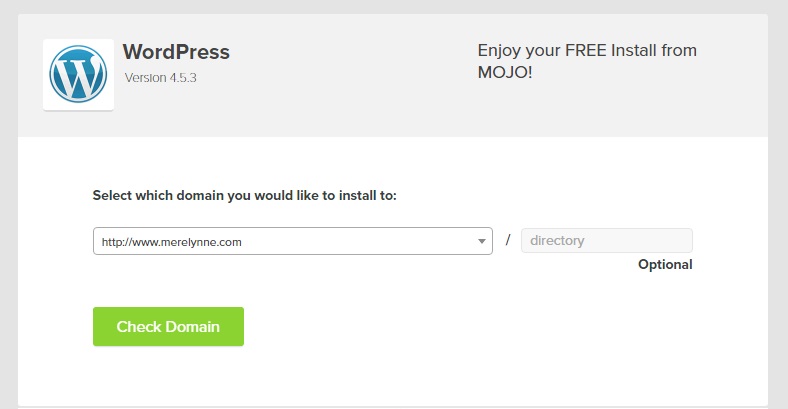
9. Select your domain so Bluehost knows where to install WordPress. A warning might pop up about overwriting files, but as long as you don’t have another website you’re good to go.
10. Click on “Show Advanced Options.” This will allow you to setup your own username and password for the WordPress install. I would recommend using a different name other than “admin” and a very strong password.
Make sure “Automatically create a new database for this installation” box is checked, unless you have a database you want to use. Read the Terms and Conditions, then click “Install Now.”
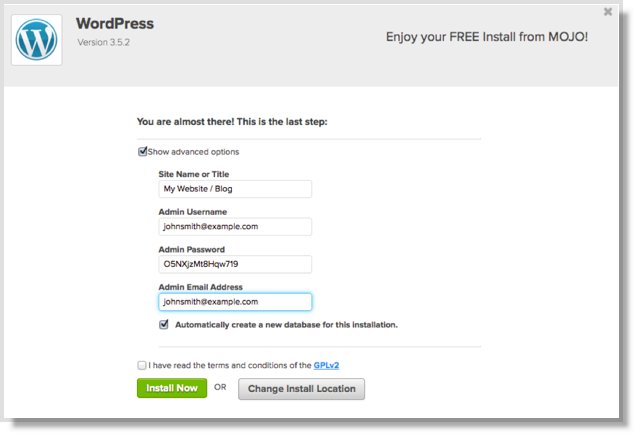
11. You will see the progress page at this point. Once WordPress is installed it will give you your URL for your new site, your username and password. You will receive an email with the URL and username, so make sure to keep that information.
12. Check your inbox for the confirmation email. In there you will find the admin URL you will need to login to your WordPress. It typically looks like this: http://www.yourblogname.com/wp-admin. Enter your username and password to access your Dashboard. Now you can control everything – write posts, create pages, and start adding plugins.
Installing A Theme to Your Site
There are three types of themes you need to know about: free, premium and custom.
Free Themes: if you’re just starting out and money is tight then free is the way to go. It’s what I did for a long time. WordPress offers many different free themes and you can always upgrade later on.
Premium Blog Themes: premium themes offer a bit more. They typically look nicer and have a lot more features. They typically start at about $80 and can go up from there.
Custom Designed Themes: These are the top offerings. The pricing can range from several hundred dollars to thousands of dollars. I haven’t been able to pull the trigger on a custom design just yet, but it’s a dream of mine.
There you have it, my tips for starting your very own self-hosted blog. It’s not complicated and once you get going there will be no stopping you. Remember self-hosted and purchasing your domain means you own your site and the content on it. Happy blogging, friends!
Latest posts by Meredith Rines, MBA, CFP® (see all)
- How To 10X Your Productivity With This Simple Tool // Using A Red Line Graph - June 24, 2020
- Mini DIY Office Makeover [Photowall Review] - June 17, 2020
- How To Track Your Projects and Profit With Subcontractors - June 11, 2020
